Motorhome External Accessories
External Compartments and outputs
*vehicle images for demonstration purposes only. Your vehicle model may vary.


1. Gas Compartment
There is a dedicated gas compartment located in the front of the vehicle, behind the drivers cabin.
This compartment can be opened using the same key that is used to open the Motorhome's entrance door.
Insert the key and unlock the door, open the door by rotating the handle and pulling the door out.
A gas compliance stamp can be found on the gas compartment door.
Be sure to lock the compartment when not in use.
2. Awning
The awning is a sun/ shade only and should not be used in windy or raining conditions.
❗ When insuring the motorhome be sure to inform the insurance company of the awning on the motorhome.
To operate wind out awnings use the awning winder arm and insert it into the awning and turn until you can reach the awning.
Release the legs, extend and secure.
See awning manuals here:
Thule Omnistor wind-out manual
(The manual version has drop down telescopic support legs, while the 12Volt version can support its own weight. All models should be closed during windy weather.)
❗ Remember to always put away the awning when moving the vehicle and every night or when not in use.
3. Gas & power outputs
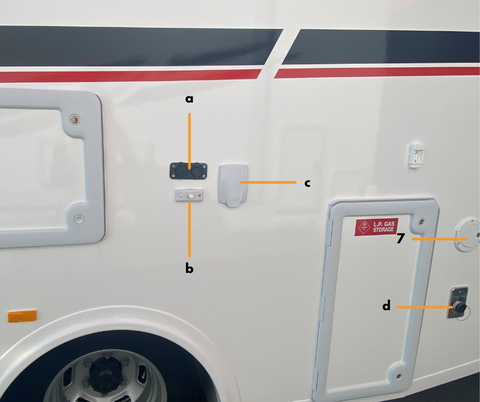
a. 12V plug in point and a USB port - covered with rubber seals. Simply lift these to use the plug / port
b. An additional aerial feed point for a TV - covered with a round plastic nozzle. Unscrew the nozzle to expose the feed point.
c. A 240V out power outlet - covered with a plastic flap. Lift the plastic flap to make use of the power outlet
💡 You can use the 240V outside to plug in appliances such as a kettle or toaster.
d. The gas output for a gas BBQ. To use gas from the motorhome to gas up your BBQ, remove the rubber seal from the socket (this can be quite tight on new vehicles), plug the BBQ gas pip into the socket and twist it and turn on the gas bottle.
This will allow gas to flow from the motorhome's gas bottles and into the BBQ.
To reseal the socket, line up the rubber cap by lining it up, pushing and twisting it in.
4. Storage Compartments

- The rear compartment is the motorhome's largest storage compartment and extends from one end to another.
In here you will find your awning crank handles, support poles for awning (model dependant), and a grey water hose (black)
The compartment can be opened and access from both sides.
To open the compartment door, insert the key (this is the same key used to open the main motorhome entrance door) and unlock the door, turn the handle and pull the door open.
💡 If you are adding a generator to your motorhome, it would be kept in this compartment. Some tunnel boots are not tall enough for a 2000W generator, be sure to measure this space prior to purchasing.
- An additional storage compartment can be found on the side of the vehicle. This compartment is not completely water proof, so it is recommended to only store items that would be ok getting wet.
To open the compartment door, insert the key (this is the same key used to open the main motorhome entrance door) and unlock the door, turn the handle and pull the door open.
There is a latch just above the compartment that holds the door open. pull it out and hook the compartment door to it.
5. Toilet Cassette
The toilet cassette compartment (where you will empty the cassette) is located externally on the side of the motorhome.
To open the compartment door, insert the key (this is the same key used to open the main motorhome entrance door) and unlock the door, the handle will pop out when the door is unlocked, turn the handle and pull the door open.
💡 This cassette box is where all the toilet waste goes and is stored. This waste is known as black water.
6. Outdoor/ Auxiliary Shower
A compartment for the outdoor shower can be found on the lower side of the motorhome.
This compartment can be opened using the smaller metal key. Insert the key and turn it to unlock the compartment.
Operate the shower by simply using the hot/cold taps in the compartment.
7.Fresh water tank infill

To open the cover of the fresh water tank infill, insert the key and unlock the flap, it will pop open once unlocked. Insert the fresh water hose and fill until the opening spews out water.
8. Water Mains Feed

Located on the side of the motorhome near the bottom of the vehicle.
Open the input by twisting open the seal. Connect the fresh water pipe by screwing the male end brass adaptor (found inside the vehicle with the motorhome manual), then clip the hose on and turn on the external main water tap.
Nothing else is happens until the tap is used inside.
It is recommended to connect to a main water feed when possible to ensure you do have to keep refilling your water tanks.
Always remember to keep the brass male end adaptor with your van as campsites/ holiday parks do not supply these.
9. Vents
vents can be located all around the motorhome.
- The two vents directly above and below each other are the fridge vents. The vents behind the fridge are used to circulate hot and cold airflow for the fridge.
- A vent near the water tank (with a Truma cover) only comes in to play if hot water is heated using gas.
This vent should only be covered while in storage. The cover can be found in utility drawer in the kitchen.
It is recommended to remove the cover for transport as it does not secure itself properly onto the motorhome and should be kept off while travelling as the system will not work if covered.
❗ Remember to close and lock all compartments before travelling off.
10. Mains power inlet
Here you will plug your RV power cable in and connect to an external power source.
Lift the covering and insert plug into the socket and plug the other end of the cable into the external 15 amp power source.
Entry door step

Some motorhome models are equipped with an external electric step.
These can be operated by using the button located inside near the entry door of the motorhome

❗ Remember to put the step all the way back in before driving off.
If the entry step to the motorhome is left out when driving off an alarm will be set off within the drivers cab.
If you hear an alarm when pulling off, it simply means that the step to the motorhome's entrance has not been fully put away.
If this happens safely stop the vehicle and lift the step back up.
If the electric mechanism for the step stops working it is most likely a blown fuse (a common problem). Do not to manually fold steps back in as it can damage the teeth of the motor, and could be quite costly to repair.
Fuses can be found under the dinette seat, pull them out to see which has failed, there is usually spare ones, just replace the blown one with a new spare one and the electric step mechanism should work again.